Showing posts with label green living. Show all posts

Wednesday, August 29, 2012

Dining in or Getting it "To Go", Where-ever it is, Refuse the STRAW


There are days when you just want to eat out. It's either you want to celebrate something, or you're just too lazy too cook your own meal. Whatever the reason is, eating out is no reason to forget to save the earth.

Usually, when we order food, we order a drink to go with it, and more often than not, a drinking straw is given with our drink. We have to learn and remember to refuse the straw. It's not helping the environment at all.

Why we shouldn't use straw

Straw is made from plastic, which we all know, doesn't decompose. What's more, straw is just a one-time-use kind of plastic. You don't reuse straw. It's downright unhygienic. Poses a lot of health issues. So what happens after you use it? Yep! it's for the dump fellas!

Straw is more trouble than it's worth

Straws in the dump is the least of all evils though. We're lucky if the straw ends up in the dump. Most of the straws end up in water ways clogging it up, or worse - gasp!, at the open sea or flowing rivers, where the poor sea creatures think it's food and swallow it! Imagine eating fish who ate plastic! wow!

But wait, straws protect me from bad stuff

Okay, hold on, protect you from what exactly? The germs and bacteria in the rim of your glass? What makes you think that it's only on the rim? Whatever's on the rim is also inside the glass, it was "washed" on the same tub of foamy hot water.
There's no point in denying that straws protect the enamel of our teeth. Yes it really does a good job at that. It's okay to use the straw for that reason, as long as your teeth is more important than saving the world :)

Recyle it

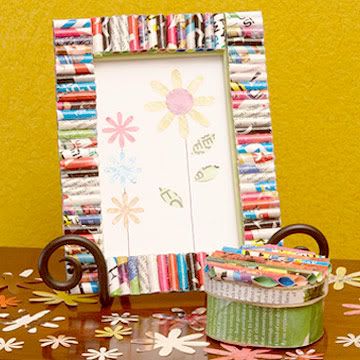
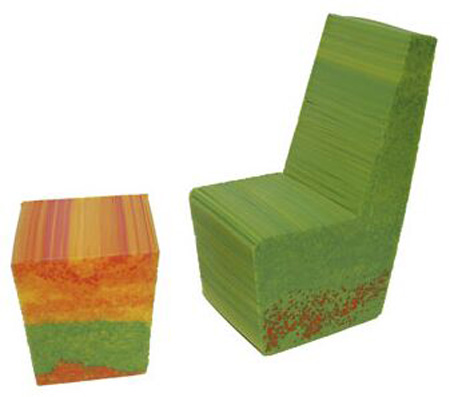
There will be times that we will forget to refuse the straw, or we cant drink our drinks without it (like shakes and frappes). What do we do now? Well we can keep the straws and reserve it for craft making like these:


With that said, let's all learn how to refuse the straw.

Thursday, March 15, 2012

How To: Produce Tote Bag From T Shirt


I saw this cute produce bag from http://www.ecouterre.com/. It's a DIY tutorial, teaches you how to make a produce bag out of an old t-shirt.


Looks pretty easy so I decided to make one for our 1-2-3 Thursdays. Although this may be more difficult than our usual short crafts, it's still very easy to make, won't take you more than half a day. I wouldn't know how much time exactly I spent making this since I did it on and off, at home, while at the office, while at Starbucks waiting for SDEHBF. (Yes, I had the guts to finish this up at Starbucks. I had 2 hours to kill!).

So anyway, you can head on over to Ecouterre for the original tutorial or stay here and see how I did it. I have to warn you though, I was never good at sewing and if the pictures in Ecouterre weren't cute and the instructions weren't easy enough to follow, I wouldn't have done this. Sewing and I don't go together. It's been this way ever since I can remember; So please don't let me hear you laughing at how uneven my stitches are. Not even a smirk!

Tools Needed:
  • School Scissors
  • Pen
  • Red X-Acto Knife
  • ruler


Materials Needed:
  • Yellow cotton shirt
  • Needle and Thread


Steps:

1. Lay the t-shirt flat

  • Yellow cotton shirt

2. Draw the shape of your tote bag. This shape would be the lines that will cut along later

  • Draw bag shape
  • Draw bag shape

3. Cut the shirt according the shape of your bag

  • cut bag shape

4. Sew all the 2 pieces of cloth together, Do not sew the bag opening (Shirt Opening)

  • backstitch

Sorry, I don't have a camera with macro, so you have to squint and stare to see my awful stitching

5. Draw dashes across the cloth starting at the 4inch line from the bag opening. Draw a dash 2 inches from the bag opening. This will serve as your handle

  • 2in & 4in mark
  • Don't use long dashes
  • Use small dashes

The 4 inch and 2 inch measurements would differ depending the size of your bag. Since mine was large, my handle was 2 inches from the opening and the lines started 6 inches from the opening. Make sure that your dashes are small. Depends on how large your bag is though. My dashes were so long (which meant that the cuts were long) that you risk your items falling out of the bag. An ideal measurement would probably be 1 inch dashes, and 1/2 inch space between the dashes. It's also good to note that you don't dash until the end/bottom of your bag. Leave at least a 4 inch allowance.

6. Cut along the dashes that you drew

  • Cut along dashes
  • Use sharp scissors

So my mistake in this bag was my dashes were too long and were too near the bottom of my bag

7. Stretch your bag

  • Stretch bag
  • Put in items


My bag will spew out the items inside when you try to move it around. Also, since my cloth is weak (thin) cotton, chances of ripping is big too. So remember. SMALL DASHES.

I'd probably try again once I find a few old shirts that I can turn into tote bags. I'm planning on selling those stuff. What do you think?

Optional: Add straps to your produce tote bag. (Will try to do this if I have the time)
1. Using the left over cloth, measure your desired strap length. Width should be about 4 inches + 1/4 inch seam allowance.
2. Cut along the the lines. Make sure to make 2 pieces of this.
3. Fold the cloth wrong side out. Stitch the open long side and one of the open short sides
4. Turn the sewn strip inside out to reveal the right side of the cloth.
5. Repeat step 3 and 4 for the second strap
6. Sew the straps on the bag

Friday, January 13, 2012

MUST HAVE: Earth-Friendly Jeans or WattWash Jeans by M+F Girbaud

http://www.youtube.com/watch?v=Htav61XNnCg

It's a payday Friday! YAY! For those of you who are out on a shopping spree, or maybe just out there to buy a new pair of jeans, make sure you grab the wattwashed jeans at Girbaud.

How is it Earth-Friendly?

Before Girbaud started WattWashing their jeans, they're using the stonewash method (which they introduced in the market 40) to give jeans that rustic appearance and design. Stone washing uses *gasp* 175 liters of water per pair of jeans *double gasp!*. So now, M+F Girbaud is pioneering a new method of  designing that "used" look using lasers. They called this methodology WattWash. WattWash uses only 5 liters of water per pair of jeans. That's a really big, but great leap. And, aside from saving lots of water, they can now also make precise and very identical designs.

Check their website out for a cool infographic about their WattWash method

So How Does WattWashing Works?

WattWash is just a laser beamed over the jeans to create the designs. Check out the videos below for a deeper understanding:


Check out these sites for more information:


http://www.wearona.com/posts/wattwash-girbaud-jeans-revolution

http://www.vogue.it/en/magazine/daily-news/2010/04/marithe

http://oneco.biofach.de/en/news/?focus=811b7864-b7b1-4283-b712-7071d2e653c4

Wednesday, December 21, 2011

Free Gift Wrapper: How to Spend Nothing on Gift Wrapping

Well, almost nothing. Wrapping gifts would depend on your ingenuity and creativity. All you need are materials that you already have on hand. If ever, the material that you'll only need to buy would be sticky transparent tape (more commonly known here in the Philippines as "Scotch Tape") and some glue (which I doubt you don't have already.

After buying your gift, you still need to wrap it and it can be so frustrating to think about how much you'll spend for gift wrappers and ribbons, all the while thinking about how much of the environment is being destroyed by our merry making. Wrapping paper isn't that recyclable since some of it contain non recyclable materials like glitter, and tape.

Now we have to think of ways to reduce our trash without dampening that Christmas Spirit. Sure recycling wrapping paper is good but it looks frayed when reused, plus it's more fun to tear out the wrapping paper when opening gifts!

So what do you need to do to be able to wrap those gifts without spending anything (or almost)? Just look around you. and be imaginative.


Sources of Free Gift Wrapping Materials:
  1. Home
  2. School
  3. Office

Free Gift Wrappers that can be Found at Home

  1. Old wrapping paper
  2. Papers, especially those reject prints and double sided print outs
  3. Old books (gasp) that are to be recyled, especially cookbooks that have pictures
  4. Old magazines and newspapers
  5. Old greeting cards
  6. Fabrics from old clothes, curtains, blankets, etc
  7. Craft leftovers
  8. Old and/or broken decorations
  9. Old small toys, pendants and other knicnacks that can be used as danglers and tags
  10. Boxes that came in with new stuff
  11. Bubble wrap

Free Gift Wrappers that can be Found in School

  1. Old test papers. Teachers usually just require this quarter's tests and seatworks. To be safe, you can use last year's test papers
  2. School memos and bulletins. All you have to do with those is to return the reply slip. Instead of throwing the paper away, use it to wrap gifts
  3. Fabric from old school uniforms that cant be handed down. repaired, or is too small to fit.
  4. Old art supplies that are being kept for future (but no apparent) use. Like art and construction paper which we keep on buying a new pack when the color we want to use was already used up in a previous project

Free Gift Wrappers that can be Found in the Office

  1. Papers that are no longer needed and can't be reused (i.e. papers that are printed on both sides)
  2. Boxes that will just be thrown out. Comapanies keep the bigger boxes for storage, but some boxes that are too small or too weak are thrown out. (Think pen boxes, permanent and whiteboard marker boxes, etc)
  3. Used up rolls of tape that can be used as a dangler (you still need to decorate it)
  4. Shredded paper in the paper shredder bin
  5. Old CDs that contain obsolete software or old files that won't be needed any more (or the data in the CD can also be found in a different CD with more updated data, etc)
Just make sure that the items that you take aren't going to be used anymore and doesn't contain any trade secrets nor confidential data.

Now that you know you can spend nothing on wrapping, skip the yuletide wrapping paper and tags and opt for a more earth-friendly wrapper.

Tuesday, December 6, 2011

Changes and What to Expect in Earth-Friendly Green Living

I haven't been able to post for quite some time now. I've been busy with a lot of personal matters that I haven't had time to blog. I've been keeping up with green news and thinking about a lot of green crafts but to be honest, my creative juices and writing mojo seem to be in all-time low lately. Every time I attempt to blog about something, or to even start crafting, my energy drops and I slump back in bed.

I guess it's because I've been sick lately and have spent the time recuperating and taking a break from a lot of things that I've been doing. I just kept work, church-work, family time and kitty (boyfriend) time as my load and took a break from everything else. I haven't fully recovered yet but I can't bare leaving my blog empty for a month.

During the time that I wasn't blogging, I kept on thinking about ways to rev up my blog. I thought about making a banner at the beginning of every post. The banner would depend on what kind of article the post is about. While thinking about the banners that I'll make, an idea struck me, why don't I follow a schedule of what to post everyday? It's like giving a theme as to what the topic the post would be. That way, I wouldn't have a hard time thinking about what to post! Yeah! It really does sound like a great idea. It gives my blog structure and predictability.

So I started tapping away on my keyboard. Thinking about what the topics would be and what I would call them. I'm pretty happy with what I've come up with but I'd like to know what you think about it

  •  Monday Green Day
    • Green News
    • Green Innovations
    • Green Events
    • I placed this on a Monday to keep us inspired in this hard-to-start-working day
  • Kitchen Beauty Tuesday
    • Beauty products straight from your kitchen
    • I decided to put it on Tuesdays to prepare for Friday night-outs
  • Green Living Wednesday
    • Topics and tips on how to live a greener life
      • Green Office/Green Employee
      • Green School/ Green Student/Green Faculty/ Green Parent
      • Green Home
    • I placed this on a Wednesday as a pick-me-upper for the droning week
  • 1-2-3 Thursdays
    • DIYs and simple crafts that you can do in 5-30 minutes.
    • Some green ideas that you can do to pass the time
    • I decided to put this on Thursdays to keep us sane until the weekend comes
  • Green Friday Shopping
    • Product reviews. Which products you should and shouldn't buy
    • This is on a Friday because usually, we go out on Fridays, either to hang out with friends and family or to shop, these product reviews will help us make decisions when buying
  • Craft Weekend
    • DIYs and crafts that need time and (sometimes) a lot of materials
    • I placed this on weekends because this is when we have time to go crazy with out crafts and share the fun with family and friends
I do hope this got you excited. These changes really are exciting my mojo. I've started working on the banners, and hopefully be able to finish before the weekend starts (Hello late nights! O.O ).

Please bear with me as this changes will be a little slow on progressing. I might not be able to post everyday as I used to, especially after this weekend, since kitty and I plan to add a new member to our (fragmented - cause we're not living together) family. We'll pick her up over the weekend, so be prepared to read a lot of cat care tips here as well.

So, that's all the time I have for tonight. I need to get back on those banners.

Wednesday, November 9, 2011

Recycling Facts

I found this in the ladies room of NAIA (Ninoy Aquino International Airport) Terminal 2, Arrivals.

Thought I'd share.

Sorry if the image is blurry. I took it in a hurry

  • Bathroom Tissue Dispeser Recycling Facts

The fact sheet was stuck onto an automatic tissue dispenser. It would have been better if the tissue dispenser didn't work with electricity to pull the sheets out.

Tuesday, November 8, 2011

HGTV Carter Can Eco-Friendly Home Improvements

Carter Can is a show from HGTV which aims to help people in renovating their homes. Whenever people think that it's impossible to renovate an area in the house due to budget and/or design constraints, Carter Comes in and saves the day. What's even greater is that Carter uses Eco-Friendly materials for the renovation.

I'm not a fan of watching T.V. but a few months ago, I chanced upon this T.V. show when my sister fell asleep while watching it. I thought, "Hey it's another home renovation show, I love these shows". I wasn't disappointed for watching it since I found out that Carter uses green materials for renovations. There's at least one piece of furniture that is eco-friendly! I love it! At the end of the show, they gave a URL to check out for more renovation and green ideas. It's http://hgtv.com/carter.


I browsed the website found some of the Eco-Friendly furniture and materials that Carter uses in the show. You may want to see the items. Check it out for Eco-Friendly materials for your next home improvement. (http://www.hgtv.com/home-improvement/going-green-eco-friendly-home-improvement-and-building-products/pictures/index.html).

Here are some of the materials and how they were used that I really loved:


Photo Used as Material
Paper Countertop Tree Pulp
Bamboo Plywood as Cabinet Doors, Drawers, and Sink Bamboo laminated together with low-VOC adhesive
Rubber Mulch Recycled Tires
Recycled Plastic Carpet PET plastic turned into yarn
Cork Flooring Cork Oak Bark
Bamboo Buthcer Block Formaldehyde-free Bamboo
Biodegradable Hemp and Wool Carpet Hemp and Wool Fibers
All these materials and how they are beneficial for use and for the environment can be found on HGTV. (http://www.hgtv.com/home-improvement/going-green-eco-friendly-home-improvement-and-building-products/pictures/index.html)

Monday, October 31, 2011

5 Tips to be Green this All Saints and All Souls Day

I've been to 2 cemeteries already and I'm glad to just rest tomorrow. There isn't, however, a rest for being green, especially now that it's a long weekend here in the Philippines. Long holidays mean vacations or spending a lot of money on food and drinks because of cemetery hopping. The All Saints Day Holiday means family reunions and get-togethers in the cemetery. So how do you continue being green?

Tip # 1:
Carpool to the cemetery.
If you have space in your car, let your other relatives ride with you, or ride with them. It doesn't make sense to bring one car each if you can squeeze into one car. If you live far from your relatives, you can leave your car at their place or vice versa, then carpool to the cemetery. Not only are you saving on parking space, you're one less car on the road, and of course, you have a smaller carbon footprint

Tip # 2:
Bring your own food
Bringing your own food means food will definitely be cheaper. It's funny how food prices inflate inside the cemetery. When you buy food in the cemetery or outside the cemetery, you'll be using plastic spoons and forks, plastic/paper/styro plates and bowls, plastic/paper/styro cups and not to mention, using a plastic or paper bag to carry everything you bought

Tip # 3:
Bring your own drink
Reduce the use of plastic bottles. It's just so wrong in many ways. Nufsed.

Tip # 4:
Use washable utensils
Don't be too lazy and buy paper plates and plastic cups. Bring the sturdy plastic ones. You can bring water for washing the plates. Just rinse the flat- and silverware with water and wash them properly at home

Tip # 5:
Mingle
Instead of using your gadgets while passing the time in the cemetery, mingle with your family or go spelunking with your cousins. We once played hide and seek in the cemetery. It was so fun :)

Wednesday, October 26, 2011

How To Think Green

In order to live a green life, you need to change how you think. We have grown accustomed to having new stuff and making life easier. We have learned that there are shortcuts that we can take to speed anything that we want to do, and this demand for shortcuts have endangered our plant, our lives.

The "New is Better" Mindset

I must say, the marketing campaigns of the 70s have successfully transformed our minds into thinking newer things means better things. Quantity over quality. A lot of people would rather buy 10 of the same cheap shoes than buy one quality shoe that would last year. "At least I have shoes that are 10 times new".

Imagine how much energy is spent in making just one shoe? Most shoes use virgin materials, meaning materials that are made out of the earth's resources. Imagine how many trees need to be cut and animals slaughtered to procure raw materials; imagine how much smoke was released in the atmosphere to turn the raw materials to virgin, workable materials. Imagine how much gas was used to ship raw materials, virgin materials and finished products from material warehouses to manufacturing warehouses. How much CO2 was emitted by airplanes and trucks for shipping? How much oil seeped in the oceans.

To think green we should have the:

Quality over Quantity Mindset

To live green, we need to change our mindset to quality over quantity. Buying lesser shoes would mean a lower demand for shoe manufacturing. Maybe you're thinking that you're just one person, and purchasing less wouldn't move the demand for shoes? Well, that's where you're blinded. Sure one person wouldn't make much of a difference, but if you count how much shoes you buy in a lifetime, you'll believe me in saying that it's enough to make an impact in the demand for sure. Now imagine that if 100 people all over the world changed their mindset, that would make a drastic impact in the demand.


"Good For the Planet, Bad for Me" Way of Thinking

I am surprised to find that a lot of people would rather put first their own comforts versus the sustainability of the world. Take straws for instance, people would rather use a drinking straw cause ice-cold beverages can damage teeth and their roots (or so they say), or that the drinking glasses weren't cleaned properly and they might get diseases from drinking on the rim (this excuse really had me wondering if the person who said it really understood what he's saying).

I'm still waiting for my front teeth to fall off, or something else, for not using straws. So far, I haven't had toothaches my teeth aren't that stained. And as for dirty drinking glasses, whatever's in the rim of that glass might as well be in the glass, since when the glasses are washed, they put everything in a tub of water, so the germs are pretty much all over.

 To think green we should have the:

"Right for the Environment, Right for Everyone" Way of Thinking

It's the age old saying, "Good doesn't mean it's right". It's time we stop fumbling with good and bad, and start working with right and wrong. Using a straw may be good for you but, it's not right for you simply because it's wrong for the environment. Whatever the earth is suffering now, we will suffer it back, twice- or maybe thrice-fold.


Monday, October 17, 2011

Recycled, Personalized, Adjusting Calendar

I woke up at the wrong side of the bed today and I feel tired, sleepy and worse, uninspired. I kept myself busy with work while thinking about what to blog about today. I was so uninspired that it was making me sad. I kept glancing at my calendar, waiting for Thursday to come and get that well deserved vacation. Then it hit me, the calendar I have at my cube! That's it!

My calendar was made from mostly recycled paper. Recycled bond papers and craft papers. It's also magnetic.


The concept behind my calendar is, instead of having a calendar that uses  lot of pages of paper, I just have a calendar where I move the numbers around every month.

The idea started back in my first job. They gave me a small space in the cork board and I decided that I want a calendar in that small space where I can post my schedule for the month. I bought push pins that can be written on for the numbers.

I don't have step by step pictures for creating the calendar, but I can just show you pieces of my calendar.

My current calendar is magnetic, because our office cubes are magnetic. The magnets I used are craft magnets which are pliable and can be cut by regular scissors. I think you can buy some at craft stores, but for me, I bought it in Daiso Japanese store here in Ortigas, Philippines.


Step 1 - Create the calendar box borders

I made mine by  cutting boxes from an orange construction paper. You need 7 boxes across and 5 boxes down. Measurement of mine is:
Entire calendar boxes: 280 cm wide, 170.5 cm long
Size of one box (measurements are the inside of the box, not the border): 30.2 cm wide, 20.6 cm long


Step 2 - Glue the calendar box in a sheet of colored/decorative paper

I used an old orange parchment paper for mine. (Take note that mine already has a decorative paper at the back cause I already made it before). This step is not required if you're using push pins/cork board.

Step 3 - Create the months of the year for your calendar using old bond papers

I didn't create any for mine cause I thought it was a waste of paper.

Step 4 - Write down the days of the week on old bond papers. Decorate and cut out


Step 5 - Cut a magnetic strip and attach at the back of the day of the week you created, using double sided tape


--or---

Step 5 - Just stick it to your calendar using glue or double-sided tape


Step 6 -  Write down the dates of the month on old bond papers or used cardstock.

Decorate and cut out. I chose cats a design for mine

---or---

Step 6 - Write the dates of the months on the space provided on the pushpin heads. Decorate if you want.


Step 7 - Cut a small magnetic strip, small enough to fit in the date you created and attach it at the back of it, using double sided tape (skip if using push pins)


Step 8 - Assemble your calendar


Step 9 - Using old bond papers cut out small squares (smaller than the size of the calendar box). These will serve as the event tags in your calendar. Put it in a small box.


So my finished calendar looks like this


You can make this calendar for office for school, or even at home! It's a great way to be organized!

Sunday, October 16, 2011

Toilet Roll Flower Notebook Decoration

I'm in a frenzy with toilet rolls lately, and thanks to my office mates, I have an abundant supply of toilet roll cores. YAY!

I decided to make a flower out of the toilet rolls to "pimp" my rather plain notebook. I must say it turned out pretty good

Materials needed to create a toilet roll flower

  • 1 Toilet roll core
  • ruler
  • pen
  • poster paint
  • glue
  • water
  • mixing bowl/cup
  • scissors or a cutter
  • something that needs to be decorated (mine was a notebook)

Step 1 - Measure 1cm across your toilet roll

Fold the roll in half and just measure one side. Just cut following the line on the side that you marked

Step 2 - Cut the toilet roll into 1cm-thick circles


Step 3 - Paint the inner side of your circles. Wait to dry.


Step 4 - Paint the outer side of your circles. Wait to dry


Step 5 - Prepare a glue-water mixture. 2 parts glue and 1 part water


Step 6 - Paint or decorate the surface that you'll stick the flower to [optional]


Step 7 - Paint the inner side of your circles with the glue-water. Wait to dry. Paint the outsides. Wait to dry


Step 8 - Fold the ends of the circles to make a leaf/petal shape


Step 9 - Stick one end of the petal to another using glue or the glue water. Press or firmly stick the petals togeter


Step 10 - Make 2 bunches of 3 petals each by doing step 11 repeatedly


Step 11 - Stick the 2 bunches together to make a flower, by adding glue to one of the bunches. Press firmly to stick the bunches together


Step 12 - Paint the surface that you'll stick the flower to with the glue-water


Step 13 - Place the flower on the surface. Trace glue water on the outer and inner edges of the flower


Step 14 - Press the flower to make it stick firmly


Step 15 -Dry the entire thing


So there you have it. A flower out of a toilet roll. You'll have an excess of 2 circles, you can opt to keep them for future projects or use them to make more flowers.

Hope you enjoyed this week's craft.