Showing posts with label earth friendly ribbon. Show all posts

Thursday, January 12, 2012

Tissue Paper Roll Craft: Treats Pillow Box

It's Thursday, so I thought I'd start my 1-2-3 Thursdays which are basically some craft or green action that you can do in a few minutes with the least number of materials.

This week's 1-2-3 Thursday is really fun and can be easily changed to fit any occasion. In my case, I made one for a little sweet nothing for my boyfriend. He absolutely loved it! He even joked that one of his drawers is already filled with notes and other stuff from me. He'll keep the box cause it's cute. WINNER!

Anyway, I saw the tutorial at Clean & Scentsible's Blog. It's so easy to make, not to mention ingenious. Makes me wonder why I didn't think of it before! Clean & Scentisble's blog have awesome pictures for the tutorial, mine has a low res pixelated one, so if you're particular about pictures head on over to her blog for a nice tutorial :)

This is my Treats Pillow Box


Anyway, here's my take on it:

Tool:
  • Orange Scissors

Materials:
  • cloud 9 chocolate
  • Tissue paper roll
  • Cute kitten sticky note
  • Left over craft paper
  • small brown paper bag

Step 1:

Fold one side of the end of the tube, inwards to create a flap

  • Tissue Paper Roll Craft Pillow Box

Step 2:

Fold the other side of the end of the tube inwards to create another flap.

The flaps are used to close off one end of tube. Repeat on the other end
  • Tissue Paper Roll Craft Pillow Box

Step 3:

Open one end and put your treats inside. Close the end again


Step 4:

Cut a thin strip of paper from a brown bag.


This will be used to create a twine

Step 5:

Twist the strip of paper to form a twine

    How to make paper twine
  • How to make paper twine

Step 6:

Seal the flaps by winding the twine around the pillow box.

Make a ribbon or a knot to secure the flaps and the twine. You can opt to finish the box here by making a horizontal wrap or decorate the box more (proceed with step 7)

Step 7:

Cut a strip of paper that can be used to wrap the mid-section of your pillow box.

Tape or glue the paper for a snug fit

Step 8:

Position your Note paper in the middle of the fastened strip of paper. Put some glue or tape and stick it to the strip of paper


Wednesday, December 21, 2011

Free Gift Wrapper: How to Spend Nothing on Gift Wrapping

Well, almost nothing. Wrapping gifts would depend on your ingenuity and creativity. All you need are materials that you already have on hand. If ever, the material that you'll only need to buy would be sticky transparent tape (more commonly known here in the Philippines as "Scotch Tape") and some glue (which I doubt you don't have already.

After buying your gift, you still need to wrap it and it can be so frustrating to think about how much you'll spend for gift wrappers and ribbons, all the while thinking about how much of the environment is being destroyed by our merry making. Wrapping paper isn't that recyclable since some of it contain non recyclable materials like glitter, and tape.

Now we have to think of ways to reduce our trash without dampening that Christmas Spirit. Sure recycling wrapping paper is good but it looks frayed when reused, plus it's more fun to tear out the wrapping paper when opening gifts!

So what do you need to do to be able to wrap those gifts without spending anything (or almost)? Just look around you. and be imaginative.


Sources of Free Gift Wrapping Materials:
  1. Home
  2. School
  3. Office

Free Gift Wrappers that can be Found at Home

  1. Old wrapping paper
  2. Papers, especially those reject prints and double sided print outs
  3. Old books (gasp) that are to be recyled, especially cookbooks that have pictures
  4. Old magazines and newspapers
  5. Old greeting cards
  6. Fabrics from old clothes, curtains, blankets, etc
  7. Craft leftovers
  8. Old and/or broken decorations
  9. Old small toys, pendants and other knicnacks that can be used as danglers and tags
  10. Boxes that came in with new stuff
  11. Bubble wrap

Free Gift Wrappers that can be Found in School

  1. Old test papers. Teachers usually just require this quarter's tests and seatworks. To be safe, you can use last year's test papers
  2. School memos and bulletins. All you have to do with those is to return the reply slip. Instead of throwing the paper away, use it to wrap gifts
  3. Fabric from old school uniforms that cant be handed down. repaired, or is too small to fit.
  4. Old art supplies that are being kept for future (but no apparent) use. Like art and construction paper which we keep on buying a new pack when the color we want to use was already used up in a previous project

Free Gift Wrappers that can be Found in the Office

  1. Papers that are no longer needed and can't be reused (i.e. papers that are printed on both sides)
  2. Boxes that will just be thrown out. Comapanies keep the bigger boxes for storage, but some boxes that are too small or too weak are thrown out. (Think pen boxes, permanent and whiteboard marker boxes, etc)
  3. Used up rolls of tape that can be used as a dangler (you still need to decorate it)
  4. Shredded paper in the paper shredder bin
  5. Old CDs that contain obsolete software or old files that won't be needed any more (or the data in the CD can also be found in a different CD with more updated data, etc)
Just make sure that the items that you take aren't going to be used anymore and doesn't contain any trade secrets nor confidential data.

Now that you know you can spend nothing on wrapping, skip the yuletide wrapping paper and tags and opt for a more earth-friendly wrapper.

Tuesday, December 20, 2011

DIY Gift Ribbon Using Paper

When I saw this tutorial on how to make your own gift ribbon using paper on how about orange, I was dying to try it out immediately, which I did. Twice to be exact, but I wasn't able to take pictures as I did it. I made another ribbon this morning and I think I'm really getting the hang of it. I took pictures this time and the ribbon was really adorable!

  • DIY earth friendly ribbon

I used regular office paper with one side printed on. Below is my take on how about orange's paper gift bow.

Materials and Tools Needed:

  • Ruler
  • Orange Scissors
  • Artline Glue Stick
  • Orange Mechanical Pencil


Step 1: Cut 9 Paper strips

  • Three (3) strips measuring the full 11 inches, 3/4 inches thick *
  • Three (3) strips measuring 10 inches, 3/4 inches thick *
  • Two (2) strips measuring 9 inches, 3/4 inches thick *
  • One (1) strip measuring 3 1/2 inches., 3/4 inches thick *
*This is assuming you're using a short bond paper (8 1/2 x 11 inches)

  • Paper strips for paper ribbon


Step 2: Twist and loop one end of the strip

Bring the end of the strip to the center to form one end of the ribbon. Hold it in place with your hand
  • Forming a paper riblet


Step 3: Twist and loop the other end of the strip

Bring the end of the strip to the center to form the other end of the ribbon. Hold it with your other (free) hand
  • Forming a paper riblet


Step 4: Adjust the ends of the strip to make the loops thinner.

The thinner it is, the better. Having wide or big ribbon loops will make it difficult to assemble the ribbon, not to mention that the ribbon will look cluttered with very wide loops.

  • Forming a paper riblet


Step 5: Mark the places where the loops or ends of the strip meet.

Make sure you also mark the corners where the loops are. This is to ensure that you will be able to put back the loops later.

  • Forming a paper riblet


Step 6: Glue the ends of the strip together

Apply the glue inside the marked areas in step 5 and stick the ends together. The lines you placed in Step 5 will help you form the shape of your strip without a hitch! Repeat this step with all the strips of paper except for the smallest (3 1/2 inch) strip. Form a ring with this strip instead. Group the riblets (the form the strips take after gluing together the ends) together according to length.

  • Forming a paper riblet
  • Finished riblet
  • twisted and looped riblets


Step 7: Form the base of the ribbon

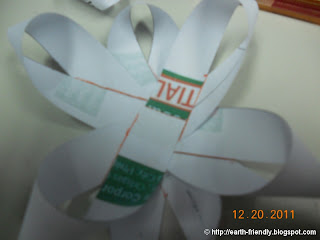
Using the 3 longest riblets, form the base by creating a cross or plus-sign (+) with 2 riblets then place the last riblet at an angle that forms an X with the riblet on top. Make sure that you put glue at the center of each riblet or stack of riblets
  • Paper ribbon base


Step 8: Form the second layer of the ribbon

Using the 3 mid-length riblets, form the 2nd layer by placing the riblets in areas where the loops don't overlap with the other riblet loops. Again, make sure that you put glue at the center of the ribbon we're forming
  • Paper ribbon 2nd layer

Step 9: Form the 3rd layer of the ribbon

Using the 2 small riblets, form the 3rd layer by placing the riblets in areas where the loops don't overlap with the other riblet loops. At this point it's hard to find an angle to put in the 3rd layer riblets, but you'll manage. Again, make sure that you put glue at the center of the ribbon we're forming.
  • Paper ribbon 3rd Layer


Step 10: Finish the ribbon

Put the loop at the middle of the ribbon to finish it. My loops looks small because I flattened my riblets a lot during stacking, which left a big gap at the middle. I can opt to add more smaller sized riblets or just place a bigger paper ring inside


So what are you waiting for? Go forth and make these neat-o and pretty ribbons for your gift wrapping and decorating needs. This is exactly what I needed to wrap my revelation day present for the Kris Kringle that my friends and I started way back in November.